AHOY HOY THERE.
In our most recent bloggers guide to SEO, we looked at no follow and follow links and how they apply to your blog. Today, we’re going to have a look at your blog’s images and how you can optimise them for search engines. HUZZAH AND CHEERS TO MERRY ENGLAND.
So, images are a HUGE part of blogging and most of us will try our best to take the nicest pictures as possible (if you are like us, then ‘try’ is the key word here). Not only are they a great way of drawing your readers in, but they’re equally as good for backing up your beauty review or showing how you would style your fresh new threads. Whether you have an amazing camera or try your best with your smartphone, most of us fashion, beauty and lifestyle bloggers will include some kind of images or photos into a post.
That’s all well and good, but taking lovely photos isn’t the only thing you should be thinking about when it comes to images on your blog. INTRIGUED?! You shouldn’t be, it’s actually quite boring…
Why should you optimise your images for search?
Optimising your images for search engines if a bit of an effort, but there is a very big and chunky reason why you should be bothered. Google’s tiny little robots can’t actually see image files. They read text, so if you haven’t tagged up your images properly, then they won’t know they’re there or they won’t know what to do with them.
But if you do tag up your images, there’s a huge opportunity for your blog’s pictures to appear in Google’s Image Search. Let’s all be honest with each other, if we’re looking for a hair dye review or foundation review, we often want to see results before reading on about the product. That’s why a lot of searchers head off to Image Search to have a nosey at whether a silver hair toner or whatevs actually works. While Google Image Search isn’t used as widely as regular Google, there’s a big opportunity there to get your images on the first page – and drive more people to your blog.
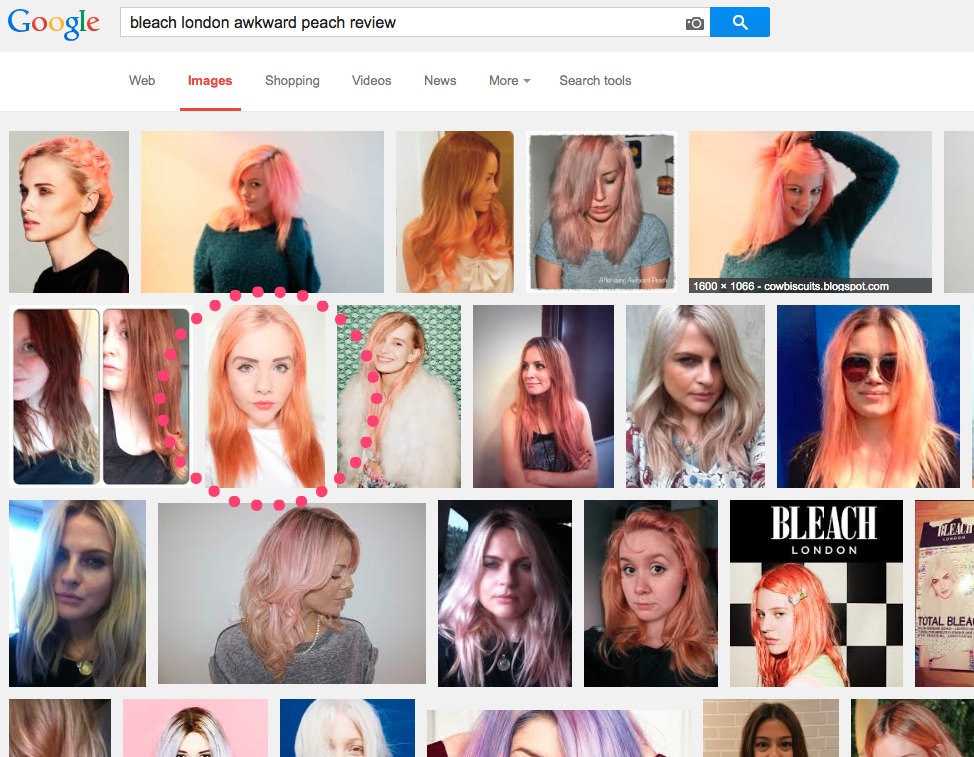
For example, here’s an image I tagged up properly in my Bleach London Awkward Peach Review that pops up on Google image search.
So…how do you actually optimise images for search engines?
As most of you fabulous bloggers will know, Google works on a keyword basis – i.e. if you type in a particular keyword, pages that are optimised well for that particular keyword will appear first. The same goes for images. If you label your picture ‘BlogImage.jpg’, search engines will rank that for ‘blog image’, rather than for ‘Lancome Foundation Review’, or whatever your blog post is about. So, the trick is to label your picture with the relevant keywords.
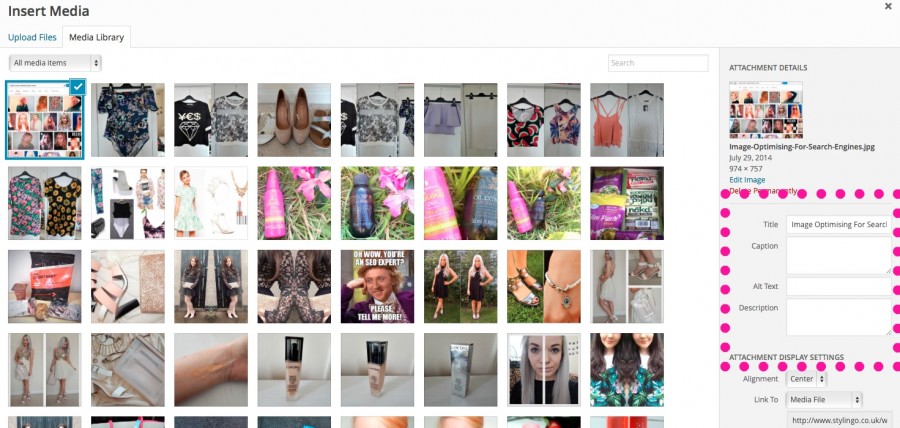
In WordPress, it’s pretty easy. When you add an image using your media library, there is an option to add a title, caption, alt text and description. It’s mainly the title and alt text that you want to focus on, as this will be the text that Google (or the search engine of your choice) will look at in particular. Label these to describe what your image is about. For example, if it is a picture of a pair of Topshop platform heels, then you will want your title or alt text to include that somewhere. If you don’t use WordPress, there should be a similar option in whatever content management system you use – just try and have a nosey about.
The Alt Text
Seeing things like ‘alt’ and ‘text’ together makes it seem hugely complicated and gets you ready to be like NAH TA, WON’T BOTHER. It’s not actually that complicated though, and the alt text is what Google will look at and be like ‘ah, so that’s what your pic was all about’.
BUT…what’s the difference between alt text and title tags for images? Well, pretty simple really. Alt text does have an impact on SEO, whereas title tags don’t. Title tags are more important from a user perspective, and you will know if your image has a title if you roll over the image, and a little box pops up with the title in it. Alt tags will appear in the code and will be what Google will look at.
Just for a bit of clarification, WordPress will automatically put the title as what you have saved your image as. If you change the title to ‘Topshop Platform Heels’, that’s what they will put in your alt text too. You can check what your alt text is by switching to the plain text viewing option and looking out for this code:
<img src=”http://www.vanityclaire.co.uk/wp-content/uploads/2014/07/Image-Optimising-For-Search-Engines.jpg” alt=”Image Optimising For Search Engines”>
Your alt text should include a short, key worded description of what your image is about.
The Image File Name
It’s important that you save your image using keywords too. That will further help Google to understand what your image is about. For example:
<img src=”http://www.vanityclaire.co.uk/wp-content/uploads/2014/07/Image-Optimising-For-Search-Engines.jpg” alt=”Image Optimising For Search Engines”>
A quick note on this too – use dashes to separate your words rather than underscores. This is because Google sees dashes as word separators and underscores as word joiners. For example:
Stylingo-Fashion-Blog = Stylingo Fashion Blog
Stylingo_Fashion_Blog = StylingoFashionBlog
Naming your images properly is something that’s easy enough to do as you go along, and can really make a big difference to how your images are ranked.
The Image Title Tag
As mentioned above, the image title tag isn’t as important as your alt text but its useful to have as a hygiene factor and from a blog reader point of view. Most browsers (e.g. Chrome, Internet Explorer or Safari) will take your title tag to display to your users rather than your alt text, so make sure that you bear this in mind when you pop in your title text.
The Caption
There’s been a lot of speculation as to whether Google takes into account image captions or not, but I think it’s ultimately up to you as to whether you use the caption option. The caption will directly appear in your blog post, and most bloggers aren’t that keen on them. Personally, I wouldn’t bother with the caption because I don’t like the way it looks on our blog. It won’t negatively affect you if you decide not to put a caption in, so don’t worry too much about it.
The Description
If you use WordPress like we do, you will have noticed the description box and may have wondered what its for. There’s no SEO benefit for filling this in and it only appears in your media library as a way of helping you remember what each image was for. Don’t bother with it unless you particularly need to describe the picture to yourself, paha.
Resizing Your Images
As a final note, its really REALLY REALLY important that you resize massive images before you upload them into a blog post. While yes, most browsers will alter them to fit your screen, it could take basically forever to load. You might lose readers and then we will all cry together. No one likes a slow loading blog. NO ONE.
So chums, hopefully this has been a bit helpful in giving you a bit of insight into how you can make sure your images are optimised best for Google (or the search engine of your choice…)
If you have any questions, just drop us a comment and we will say NO LEAVE US ALONE.




This is fab and super helpful I use wordpress and didn’t even bloody know I could do this xxx
Haha yeah, its definitely worth doing though even for just a few extra visits! xxx
Oh wow, I never thought of any of that. You are now my guru, I bow down to your knowledge. Thank you!
Hahahahaha thanks Heather xxx
This is such a fab post, I’ve always been confused about this but now it makes a whole load of sense! Thank you ladies xx
Aww no worries Georgie, glad it helped!! xxx
Hey ladies, this was so helpful!! I’m on wordpress I resize my images but no idea what side I should use, what do you think?